Navigating the New Frontier of Database Cost Optimization: Aurora I/O-Optimized and the Power of Automation

In the ever-evolving landscape of cloud computing, database management remains a critical challenge for businesses of all sizes. Today, we’re diving into a game-changing development in this space: Amazon Aurora I/O-Optimized.

But more importantly, we’ll explore why this new feature, while powerful, isn’t a silver bullet — and how automation is the key to unlocking its full potential.

The IOPS Enigma: A Long-Standing Challenge

In many cases, IOPS charges can exceed the cost of the Aurora cluster itself. Yes, you read that right — you might be paying more for IOPS than for the actual database instances and storage. It’s not uncommon to see IOPS costs accounting for 50%, 60%, or even 70% of the total Aurora spend for I/O-intensive workloads.

This situation has been a thorn in the side of CTOs and CFOs alike, making budget forecasting a nightmare and often leading to unexpected cost overruns.

Imagine you’re running an e-commerce platform processing thousands of transactions per minute. Each product view, cart update, and purchase translates to database read and write operations. As your business grows, so do these operations — and their associated costs. The result? Budgeting nightmares and the constant fear of cost overruns.

Enter Aurora I/O-Optimized: A Step in the Right Direction

On May 11, 2023, AWS unveiled Amazon Aurora I/O-Optimized, a new configuration designed to address these IOPS-related challenges. Here’s what makes it noteworthy:

  1. Zero Charges for I/O Operations: You only pay for database instances and storage usage.
  2. Predictable Pricing: Easier forecasting of database spend.
  3. Improved Performance: Increased throughput and reduced latency for demanding workloads.
  4. Potential for Significant Savings: Up to 40% cost reduction for I/O-intensive applications.

Sounds like a silver bullet, right? Not so fast.

The Hidden Complexity: When and How to Switch?

While Aurora I/O-Optimized is undoubtedly a powerful tool, it introduces a new challenge: determining when and for which clusters to make the switch. The rule of thumb is simple — if IOPS charges exceed 25% of your total Aurora spend for a cluster, switching could save you up to 40%. But in practice, this calculation is far from straightforward:

  • Data Aggregation: Gathering cost data across all the resources in the clusters. This includes not just the primary instances, but also read replicas and storage volumes. Each of these components contributes to the overall cost and IOPS usage, making the aggregation process complex.
  • Granular Analysis: Separating I/O costs from other charges for each cluster. This requires diving deep into the billing data to isolate IOPS charges from compute, storage, and other costs.
  • IOPS Cost Association: A significant challenge lies in associating IOPS costs with specific clusters. In the Cost and Usage Report (CUR), IOPS costs are linked to a cluster ID that is a generated UUID, not the actual cluster identifier you’re familiar with. This necessitates additional API calls and data processing to map these costs back to your actual Aurora clusters, adding another layer of complexity to the analysis.
  • Continuous Monitoring: Usage patterns change over time, requiring ongoing analysis. What might be cost-effective today could change tomorrow as your application’s demands evolve.
  • Scale Complexity: As your database fleet grows, the complexity increases exponentially. Imagine performing this analysis across dozens or even hundreds of clusters, each with its own unique usage patterns and cost structures.

For a company managing hundreds of Aurora clusters, manually performing these calculations becomes not just time-consuming, but practically impossible.

The Automation Imperative

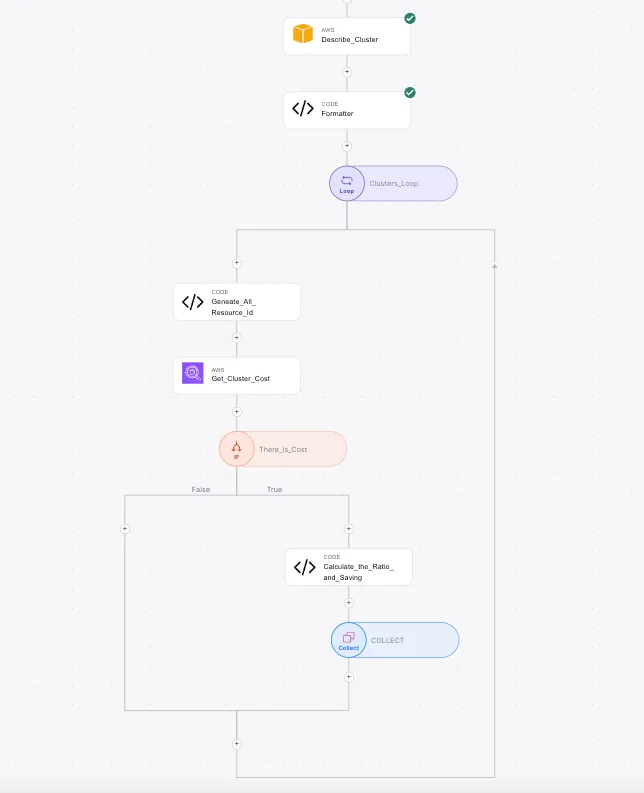
This is where the true value of automation shines. An intelligent, automated system can:

  1. Continuously monitor all Aurora clusters
  2. Perform complex calculations in real-time
  3. Identify clusters that would benefit from switching to I/O-Optimized
  4. Implement changes automatically (with appropriate approvals)
  5. Track the impact of changes over time

However not all automation solutions are created equal.

Why Wiv? Tailored FinOps Automation with Hundreds of Pre-defined Templates

Wiv’s solution stands out by addressing these challenges head-on:

When it comes to optimizing costs for Amazon Aurora, particularly with the new I/O-Optimized option, Wiv stands out as a game-changing solution. Here are three key reasons why:

  1. No-Code/Low-Code Platform with AI: Wiv’s AI-powered platform enables anyone to create tailored Aurora cost optimization workflows without coding expertise. Financial analysts, DBAs, or cloud architects can all design sophisticated strategies, democratizing FinOps automation.
  2. Hundreds of Ready-to-Use Templates: Wiv offers a vast library of pre-built templates, including ones specific to Aurora cost optimization. For the I/O-Optimized use case, you can quickly scan all your Aurora clusters across your infrastructure, identifying saving opportunities in minutes, not weeks.
  3. Human-in-the-Loop Implementation: While automating Aurora optimizations, Wiv maintains human oversight. When the system identifies potential I/O-Optimized configuration switches, it initiates an approval process, routing recommendations to the engineering team. This ensures all technical considerations are accounted for before implementation.

Real-World Impact: Before and After

Let’s consider a mid-sized e-commerce company to illustrate the transformative power of combining Aurora I/O-Optimized with Wiv’s automation:

Before:

  • Struggled with unpredictable IOPS charges, often exceeding 30% of total Aurora costs.
  • Manual assessment of dozens of Aurora clusters was time-consuming and error-prone.
  • Missed optimization opportunities due to the complexity of calculations.
  • Engineering team spent significant time on database management rather than core business logic.

After Implementing Aurora I/O-Optimized with Wiv:

  • Automatic identification of 15 clusters suitable for I/O-Optimized.
  • Seamless transition to the new configuration with zero downtime.
  • 35% reduction in overall Aurora costs.
  • Continuous monitoring ensuring optimal configuration as usage patterns change.
  • Engineering team freed up to focus on innovation and customer experience.

Engineering team freed up to focus on innovation and customer experience.

Amazon Aurora I/O-Optimized is a significant step forward in addressing the longstanding challenge of IOPS costs. However, its true potential is unlocked only when combined with intelligent automation.

Wiv’s solution doesn’t just save you money; it transforms how you manage your infrastructure:

  • Effortless Scalability: From startups to enterprises, manage any number of clusters with ease.
  • AI-Driven Automation: Stay ahead of the curve with intelligent, automated optimization processes.
  • Resource Reallocation: Free up your team to focus on innovation rather than cost management.

In the fast-paced world of cloud computing, manual optimization is no longer feasible. The combination of Aurora I/O-Optimized and Wiv’s automated intelligence offers a powerful solution to one of the most persistent challenges in database management.

Are you ready to take control of your Aurora costs and performance? Discover how Wiv can transform your approach to database management, making cost optimization a seamless, intelligent, and continuous process. The future of database management is here — and it’s automated.

Snapping Out of the Snapshot Trap: Taming AWS EC2 Costs with Automation

Introduction

In the dynamic landscape of AWS, EC2 snapshots play a vital role in data protection and disaster recovery strategies. However, as your cloud infrastructure expands, the costs associated with these seemingly affordable snapshots can quickly escalate if left unchecked. This blog post explores the intricacies of snapshot management, focusing on identifying idle snapshots, understanding snapshot types, and implementing cost-effective practices to optimize your AWS environment.

The Snapshot Cost Pitfall

One of the most common challenges AWS users face is underestimating the details of the cloud cost. Understanding why AWS charges specific amounts for specific resources, and in the case of snapshots, underestimating the cumulative cost impact of snapshots. While individual snapshots may appear inexpensive, the aggregated cost of numerous snapshots over time can become a significant burden on your budget. This is particularly evident when snapshots are created frequently and left unmanaged, resulting in a proliferation of idle snapshots that silently consume resources and drive up costs.

Identifying Idle Snapshots

To effectively combat the cost escalation caused by idle snapshots, it is crucial to regularly assess your snapshot inventory. Idle snapshots are those that are no longer required or utilized, yet they continue to occupy storage space and contribute to rising costs. A common approach to identify idle snapshots is to establish an age threshold, such as 90 days, and consider snapshots older than this threshold that have not been used for creating new instances or restoring data as candidates for cleanup.

By proactively identifying and removing these idle snapshots, you can optimize storage utilization and maintain cost efficiency.

Understanding Snapshot Types

EC2 snapshots are categorized into two primary types: Regular Snapshots and Amazon Machine Images (AMIs). Understanding the distinct characteristics and use cases of each type is essential for effective snapshot management.

1. Regular Snapshots:

  • Capture the point-in-time state of an EC2 instance’s EBS volumes.
  • Employ incremental backup, storing only the changed blocks since the previous snapshot.
  • Primarily used for data backup and restoration purposes, as well as creating new EBS volumes.

2. AMIs:

  • Comprehensive snapshots that encapsulate all the necessary information to launch an EC2 instance.
  • Include a template for the root volume, launch permissions, and block device mapping.
  • Enable the creation of new instances with the same configuration as the source instance.

Automated vs. Manual Snapshots

The method of creating snapshots, whether automated or manual, has a direct impact on cost efficiency.

1. Automated Snapshots (Incremental):

  • Generated using AWS Backup or services like Amazon Data Lifecycle Manager (DLM).
  • Leverage incremental backup by default, capturing only the changes since the last snapshot.
  • Incur charges based on the delta (changed data), resulting in cost optimization.

2. Manual Snapshots (Full):

  • Created manually using the AWS Management Console, CLI, or SDKs.
  • Capture the entire contents of the EBS volume with each snapshot.
  • Incur charges based on the full size of the snapshot, potentially leading to higher storage costs.

It is important to note that the initial snapshot of an EBS volume is always a full snapshot, regardless of the creation method.

* * *

AWS Snapshot Charging Overview

AWS charges for EC2 snapshots based on the amount of storage space your snapshots use in Amazon S3. However, the charging is not straightforward per-gigabyte storage; it’s based on the differential storage between snapshots:

  • Initial Snapshot: You’re charged for the storage of the entire volume data that the snapshot contains.
  • Subsequent Snapshots (Incremental): You are charged only for the additional data (delta) that new or changed blocks represent.

Example of Incremental Snapshot Costs:

Let’s say you have an EBS volume with 100 GB of data. You create an initial snapshot (Snapshot 1) of this volume, which will be a full snapshot. At this point, you’ll be charged for the storage of the entire 100 GB.

Now, suppose you add 20 GB of new data to the volume and then create a second snapshot (Snapshot 2). Snapshot 2 will only contain the incremental changes since Snapshot 1, i.e., the 20 GB of new data. You’ll be charged for the additional 20 GB used by Snapshot 2, bringing your total snapshot storage cost to 120 GB (100 GB for Snapshot 1 + 20 GB for Snapshot 2).

If you create a third snapshot (Snapshot 3) after modifying 10 GB of the original data and adding 5 GB of new data, Snapshot 3 will only contain the incremental changes of 15 GB (10 GB modified + 5 GB added). Your total snapshot storage cost will now be 135 GB (100 GB for Snapshot 1 + 20 GB for Snapshot 2 + 15 GB for Snapshot 3).

This demonstrates how subsequent snapshots after the initial one only capture incremental changes, helping optimize storage costs.

Impact of Deleting Snapshots

When you delete a snapshot, AWS does not necessarily delete all the data in that snapshot. Instead, it only deletes the data exclusive to that snapshot and not used by any other snapshots. Here’s how this impacts costs:

  • Deletion of an Older Snapshot: Suppose you have three snapshots (Snap1, Snap2, and Snap3) and you decide to delete Snap1. If blocks from Snap1 are not needed by Snap2 or Snap3, they are deleted. If Snap1 contains unique blocks that are required by Snap2 or Snap3, these blocks are preserved, and you continue to be charged for them.
  • Cost Impact: Deleting Snap1 might not reduce your storage costs much if Snap2 and Snap3 rely heavily on the data initially backed up in Snap1. In some cases, if Snap1 held a lot of unique data that later snapshots do not use, deleting it could decrease costs.

Remediating Idle Snapshots

To maintain cost efficiency and a clean AWS environment, it is imperative to regularly remove idle snapshots:

1. Regular Snapshots:

  • Utilize the AWS Management Console or CLI to delete the snapshot.
  • Verify that the snapshot is not associated with any instances or AMIs prior to deletion.

2. AMIs:

  • Deregister the AMI using the AWS Management Console or CLI before deleting the associated snapshot.
  • Verify the absence of any running instances launched from the AMI and create a new AMI if necessary.
  • Ensure that the AMI has not been used to launch instances within a specified timeframe.

By customizing your snapshot management workflow with Wiv.ai, you can strike the perfect balance between automation and human control, ensuring cost optimization without compromising on oversight.

Conclusion

AWS EC2 snapshots may appear cost-effective on an individual basis, but the aggregated costs can quickly spiral out of control if left unchecked. By understanding the different types of snapshots, proactively identifying idle ones, and leveraging automation tools like Wiv, you can effectively manage your snapshot lifecycle and keep costs under control. Remember, in the world of cloud computing, every cent counts, and implementing a robust snapshot management strategy is crucial for long-term cost optimization and operational efficiency.

Automating Your FinOps Process the Right Way: A Step-by-Step Guide

Introduction:

As cloud adoption continues to grow, organizations are increasingly focusing on optimizing their cloud costs through FinOps practices. Automating your FinOps process can help streamline operations, reduce manual effort, and improve efficiency. However, it’s crucial to approach automation strategically to ensure success. In this blog post, we’ll explore the right way to automate your FinOps process, focusing on key principles and providing practical examples.

Principle 1: Keep the Human in the Loop

When automating your FinOps process, it’s essential to keep the human element involved. While automation can handle repetitive tasks and data analysis, human judgment and decision-making remain critical. Involve your FinOps team in defining the automation goals, reviewing the results, and making informed decisions based on the insights provided by the automated systems. Strike a balance between automation and human oversight to ensure accuracy and accountability.

Principle 2: Focus on Automating Parts, Not Everything at Once

Attempting to automate your entire FinOps process from day one can be overwhelming and lead to complications. Instead, adopt a phased approach by identifying specific parts of the process that can benefit from automation. Start with tasks that are time-consuming, error-prone, or require consistent data analysis. By automating these parts first, you can gain quick wins and build momentum for further automation efforts. Remember, automation is a journey, not a destination.

Principle 3: Integrate Automation with Your Existing Environment and Tools

When implementing automation, consider how it will integrate with your existing environment and tools. Ensure that your automated solutions can seamlessly exchange data and trigger actions within your current setup. For example, if you use a task management tool like Jira, explore ways to integrate your FinOps automation with Jira to streamline workflows and keep stakeholders informed.

Example: Automating Cost Optimization Detection and Notification

Let’s consider a specific example to illustrate how you can apply these principles in practice. Suppose you want to automate the detection of cost optimization opportunities and notify the relevant resource owners for approval before taking action. Here’s how you can approach it using Wiv:

  1. Automate the Detection:
    • Utilize Wiv’s built-in integrations with cloud cost monitoring tools to analyze your cloud usage and identify potential cost optimization opportunities.
    • Set up automated alerts or notifications within Wiv when specific cost thresholds are exceeded or when resources are underutilized.
  2. Notify Resource Owners:
    • Use Wiv’s workflow automation capabilities to create a process that automatically notifies the relevant resource owners when cost optimization opportunities are detected.
    • Customize the notification templates to include details about the identified opportunities and the potential cost savings.
  3. Request Approval:
    • Leverage Wiv’s approval mechanism to allow resource owners to review and approve the suggested optimizations directly within the platform.
    • Provide a user-friendly interface for owners to grant approval or request further information.
  4. Automate Actions and Integrate with Task Management:
    • Upon receiving approval, use Wiv’s automation features to execute the approved cost optimization actions.
    • Integrate Wiv with your task management tool, such as Jira, to automatically create tasks or tickets for tracking the progress and completion of the optimizations.
    • Configure Wiv to update stakeholders on the status of the optimizations through automated notifications or task updates.

By leveraging Wiv’s no-code/low-code capabilities, you can automate specific parts of your FinOps process while keeping the human in the loop for decision-making. The platform’s intuitive interface and pre-built integrations make it easier to implement automation without extensive engineering resources.

Benefits of Automating Your FinOps Process:

By automating your FinOps process, you can expect significant benefits, including:

  • Cost Savings: Automated cost optimization detection and actions help identify and eliminate unnecessary cloud expenses.
  • Improved Efficiency: Automating repetitive tasks and data analysis frees up valuable time for your FinOps team to focus on strategic initiatives.
  • Faster Decision-Making: Automated alerts and notifications enable quicker identification and resolution of cost optimization opportunities.
  • Enhanced Collaboration: Integrating automation with task management tools promotes better communication and collaboration among teams.

Conclusion:

Automating your FinOps process the right way involves keeping the human in the loop, focusing on automating parts incrementally, and integrating automation with your existing tools. By following these principles and leveraging platforms like Wiv, you can streamline your FinOps workflows, reduce costs, and improve operational efficiency. Start by assessing your current processes, identifying automation opportunities, and creating a phased implementation plan. With the right approach and tools, you can unlock the full potential of FinOps automation and drive long-term success in cloud cost optimization.

Navigating the Rising Tide of AWS Pricing: A FinOps Perspective on Extended Support Fees and Automation Strategies

Introduction

In recent months, Amazon Web Services (AWS) has introduced several pricing changes and constraints that have caught the attention of businesses relying on their cloud services. From disabling the ability for third-party vendors to move Savings Plans between organizations to limiting the sale of EC2 Reserved Instances on the marketplace, AWS has been making adjustments that impact cost management strategies. Additionally, AWS has introduced a new charge for attached Elastic IP v4 addresses, which can add up quickly for organizations with a large number of instances using Elastic IPs.

One of the most significant changes introduced by AWS is the Extended Support Fee, which applies to older versions of popular services like Amazon RDS for MySQL and PostgreSQL, as well as Amazon EKS. AWS will end standard support for both MySQL 5.7 on February 29, 2024 and PostgreSQL 11 on March 31, 2024. After this date, any database instances still running these versions will be automatically enrolled in Amazon RDS Extended Support. These fees will persist until the databases are upgraded to newer supported versions, such as MySQL 8.0 or PostgreSQL 15. To avoid these additional costs, it is strongly recommended to upgrade to a newer version before the enrollment dates.

This new fee has raised concerns among businesses, leading to the question: Is this a new trend in cloud pricing?

In this blog post, we’ll focus on the Extended Support Fee, exploring its impact on RDS and EKS pricing, and discuss how FinOps strategies and automation can help businesses navigate these changes effectively.

The Complexity of RDS Extended Support Pricing

The Extended Support Fee for RDS introduces a new layer of complexity to pricing calculations. The fee is based on a combination of factors, including the number of cores used by the database instance, the specific database engine (such as PostgreSQL), the version of the engine, and the duration of the extended support (1 year or 3 years).

To accurately assess the financial impact of the Extended Support Fee, users need to carefully review each RDS instance in their infrastructure. This process involves identifying the specific engine, version, instance type, and size, and then determining the number of cores to perform the cost calculation. For organizations with a large number of RDS instances, this task can quickly become overwhelming and time-consuming.

The Dramatic Increase in EKS Pricing

Another notable change in AWS pricing is the substantial increase in EKS costs for older versions. The hourly price for EKS clusters running Kubernetes versions in extended support (1.23 and higher) has skyrocketed from $0.10 to $0.60, representing a staggering 600% increase. These changes will take effect from the April 1, 2024. This dramatic price hike can have a significant impact on businesses heavily reliant on Kubernetes orchestration.

While upgrading to a newer EKS version, such as 1.27 or higher, is often the most straightforward solution to avoid the increased costs, it may not always be feasible, particularly for production environments. Businesses should plan to upgrade their Amazon EKS clusters to newer Kubernetes versions in standard support before the extended support pricing takes effect on April 1, 2024.

Kubernetes versionUpstream releaseAmazon EKS releaseEnd of standard supportEnd of extended support
1.29December 13, 2023January 23, 2024March 23, 2025March 23, 2026
1.28August 15, 2023September 26, 2023November 26, 2024November 26, 2025
1.27April 11, 2023May 24, 2023July 24, 2024July 24, 2025
1.26December 9, 2022April 11, 2023June 11, 2024June 11, 2025
1.25August 23, 2022February 22, 2023May 1, 2024May 1, 2025
1.24May 3, 2022November 15, 2022January 31, 2024January 31, 2025
1.23December 7, 2021August 11, 2022October 11, 2023October 11, 2024

Automation becomes a critical tool in the FinOps arsenal.

Automation: The Key to Managing Pricing Changes

To effectively navigate the complexities of AWS pricing changes, automation becomes a critical tool in the FinOps arsenal. Automating the process of calculating the impact of the Extended Support Fee and identifying instances subject to the fee can save time and reduce errors.

By building automated processes to monitor the impact of pricing changes on your infrastructure, you can gain real-time visibility into your costs and make informed decisions. These automation solutions can help you:

  • Identify RDS and EKS instances subject to the Extended Support Fee
  • Calculate the cost impact based on specific engine, version, and instance characteristics
  • Generate reports and dashboards to visualize the financial implications
  • Trigger alerts and notifications when costs exceed predefined thresholds

Moreover, automation can assist in the process of upgrading RDS and EKS instances to newer versions that are not subject to the Extended Support Fee. By implementing an automated upgrade process with built-in approval workflows, you can streamline the transition to cost-effective versions while maintaining control over the process.

Leveraging FinOps Platforms for Automation

Platforms like Wiv can simplify the process of implementing FinOps automation. Wiv provides a no-code/low-code environment that empowers businesses to create and manage workflows for automating FinOps tasks, including cost optimization and control.

With features such as workflow automation, process management, integrated dashboards, and datastores, Wiv allows users to build tailored FinOps automation solutions that address their specific needs, regardless of their coding expertise.

Conclusion

The introduction of the Extended Support Fee and the increase in EKS pricing are just a few examples of the pricing changes and constraints introduced by AWS in recent months. These changes have raised concerns among businesses and prompted the question of whether this is a new trend in cloud pricing.

To navigate these changes effectively, businesses must adopt FinOps strategies and leverage automation to manage costs and optimize their cloud infrastructure. Automation plays a crucial role in calculating the impact of pricing changes, identifying instances subject to new fees, and streamlining the process of upgrading to cost-effective versions.

Platforms like Wiv can simplify the implementation of FinOps automation, empowering businesses to create tailored solutions that address their specific needs. By embracing automation and adopting a proactive approach to cost management, businesses can navigate the rising tide of AWS pricing changes and ensure the long-term sustainability of their cloud infrastructure.

Why Ownership Tracking in FinOps is Crucial: Unpacking the Challenge

In the world of FinOps, where Cloud Cost Management and Optimization is paramount, identifying the ownership of specific resources stands out as one of the most formidable challenges.

The Challenge of Ownership

Imagine a scenario where multiple teams and members are using various resources within the cloud. Without proper tracking, it’s nearly impossible to understand who is responsible for what, leading to inefficiency, lack of accountability, and spiraling costs.

The market is flooded with tools that can generate substantial saving opportunities. However, when ownership is missing, questions arise like who will implement these recommendations? How can we verify if these recommendations are true? Often, the FinOps team is stuck, unable to act on these cost-saving measures because they don’t know how to find the ownership of the resource that should be handled.

Best practices in FinOps advocate the use of specific tags like ‘createdby’ or ‘owner.’ These tags offer a clear line of sight to the responsible party for any given resource, such as an EC2 instance, facilitating cost tracking and ensuring proper governance.

How can I handle — untagged resources

Now that we understand why it’s so important to add the owner tag, the question is: how can I handle a situation where I have hundreds of untagged resources? How can I find the owner of the resource?

Extract owner from CloudTrail

CloudTrail is an audit service log that can help customers track activity in their account. You can find the event of creating the resource, extract the username that created the resource, and then add the tag owner to the resource.

Here is an example of a CLI command that can find the event:

aws cloudtrail lookup-events --lookup-attributes AttributeKey=ResourceName,AttributeValue=INSTANCE_ID --query "Events[?EventName=='RunInstances']" --region us-east-1

Cases that can be a little bit more challenging (EBS)

With Elastic Block Store (EBS), things get more complicated. If an EBS is created via an EC2 instance, you’ll need to find one event type (RunInstances).

If it’s without an EC2, it’s a different event altogether (CreateVolume). This complexity requires a nuanced approach to track and manage the resources effectively.

Real-time Governance with CloudTrail

CloudTrail is a real-time events service, and it can be a game-changer by listening and finding resources that were created without specific tags, and then tagging them appropriately. By automating this process, you can ensure that all resources are tagged as they are created, keeping your governance structure robust and reactive.

Automate with Wiv: Your Partner in FinOps

In the intricate labyrinth of FinOps, finding a streamlined path is essential. But what if there was an even simpler way to navigate all of this? Meet Wiv, our cloud-native No Code Drag & Drop Workflow Automation platform, tailor-made for FinOps and operations teams. Wiv is not just a tool; it’s a solution, a way to make complex processes feel effortlessly simple.

With Wiv, you can:

  1. Automate the Tagging Process: No more manual tracking or complicated coding. With predefined workflows, Wiv understands how to find the owner in CloudTrail and automatically tag your resource, even in intricate cases like EBS. It’s about making what’s complex simple.
  2. Real-time Response with CloudTrail Events: Wiv listens to CloudTrail, reacting in real-time to add tags, avoiding the risk of unmanaged resources. It’s like having a vigilant watchdog ensuring everything is in its right place.
  3. End-to-End FinOps Automation: From executing recommendations to enforcing governance, handling alerts, managing commitments, and so much more, Wiv is here to handle every aspect of your FinOps process. And the best part? You can do all this without writing a single line of code!

By leveraging Wiv’s capabilities, the challenges of resource ownership tracking become stepping stones to a more streamlined, cost-effective cloud operation. Wiv is not just about automation; it’s about intelligent automation that understands your needs, adapts to your challenges, and helps you conquer your cloud management goals. Let Wiv be your guide, your ally, in the ever-evolving world of FinOps.

Conclusion

The challenge of identifying ownership in FinOps doesn’t have to be a roadblock. By embracing best practices like tagging, using tools like CloudTrail, and leveraging automation platforms like Wiv, you can conquer this obstacle. Wiv’s intelligent automation helps you navigate even the most complex scenarios, ensuring that your resources are always managed efficiently. Let Wiv help you automate your everyday FinOps tasks, and take your cloud cost management to the next level.